PrintPayGo – Frequently Asked Questions (FAQ)
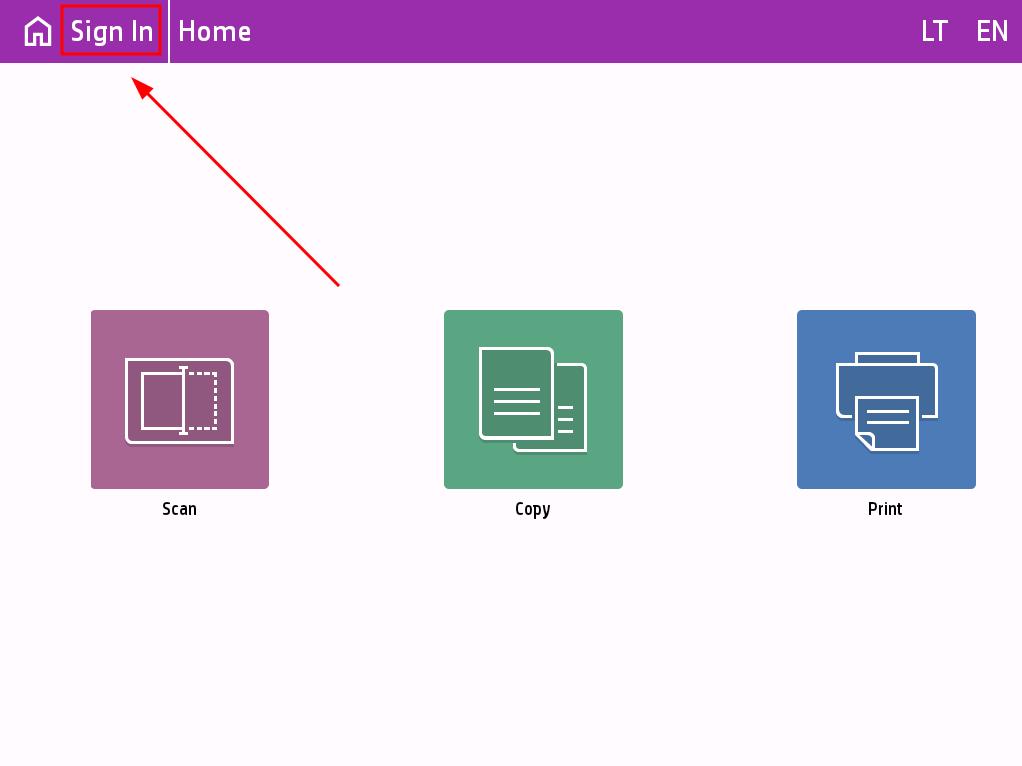
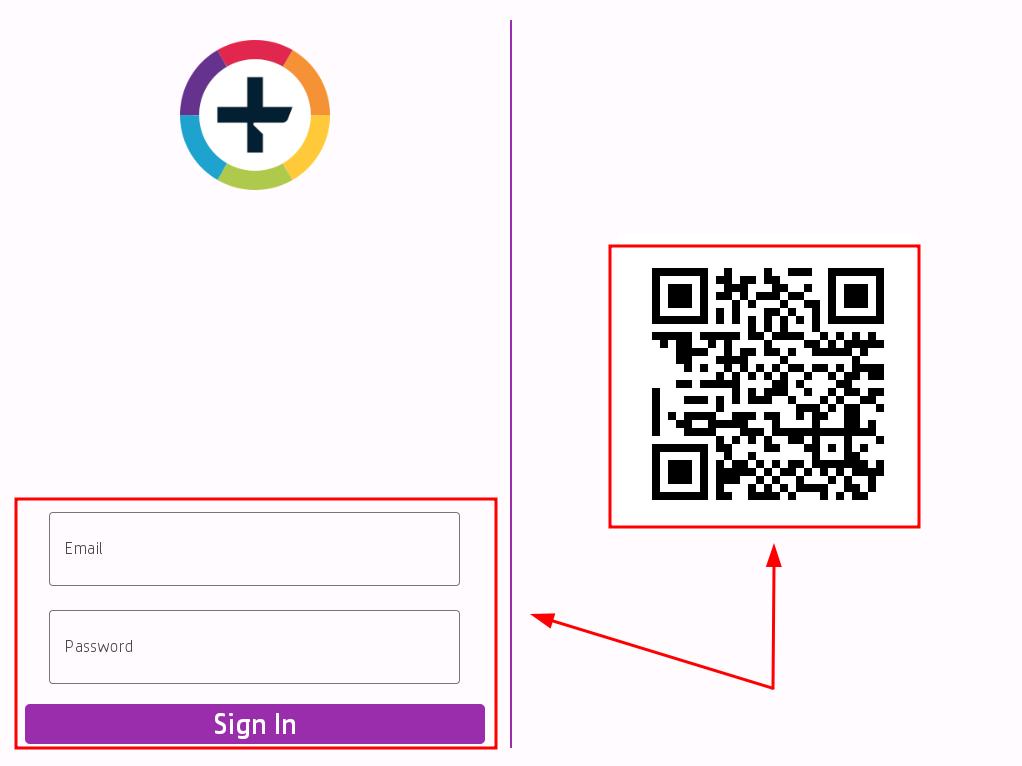
To connect to the printer using your PrintPayGo account, press the button Sign In.
Then enter your email address and password or scan the QR code using the PrintPayGo app.
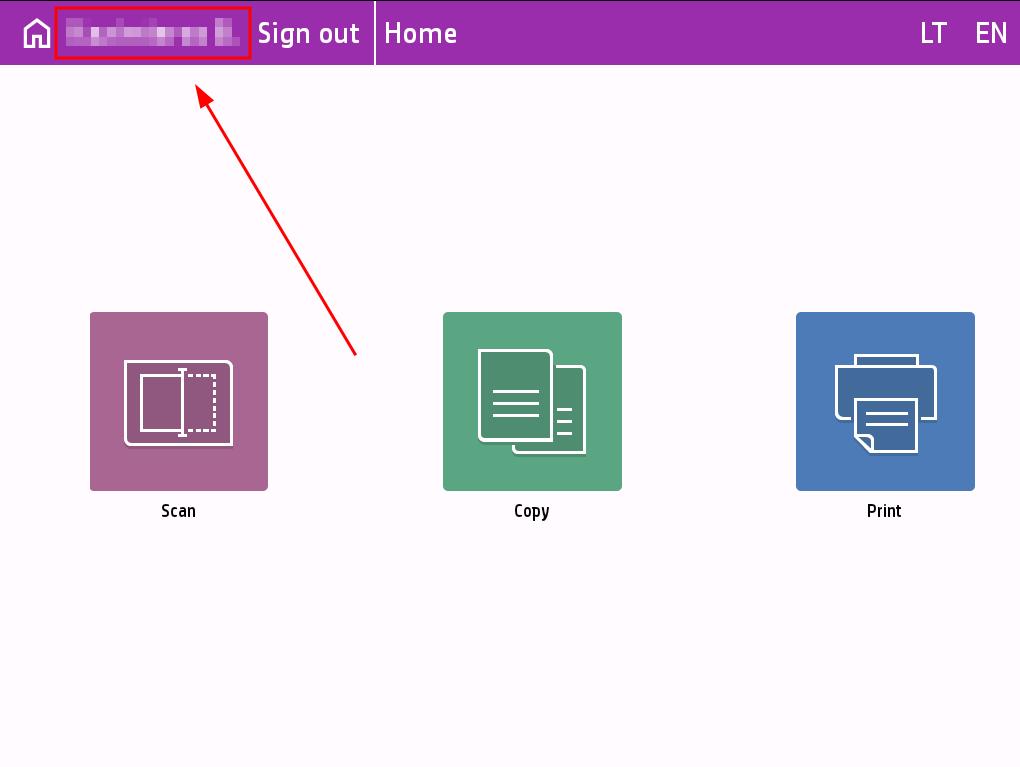
After logging in, you will be redirected to the main window, where you will see your account name and surname at the top, as well as the Sign out button.
PrintPayGo supports the most commonly used Office document formats (.doc, .xlsx, .pptx), as well as PDF, JPG, and PNG.
No, unfortunately, at this time you can only print the documents that you upload to the PrintPayGo system, or that you have on your mobile phone or USB drive.
Yes. If the selected location offers color printing, you’ll be able to choose between color and black-and-white printing in the app. You can find the printer’s features on the PrintPayGo printer map.
Yes. Before confirming the print job, you can choose between single-sided and double-sided printing.
Depending on the location, you can print in A4 and A3 supported formats. Detailed information is provided when you select a printer.
Maksimali įkeliamo spausdinti dokumento apimtis yra iki 100 Mb.
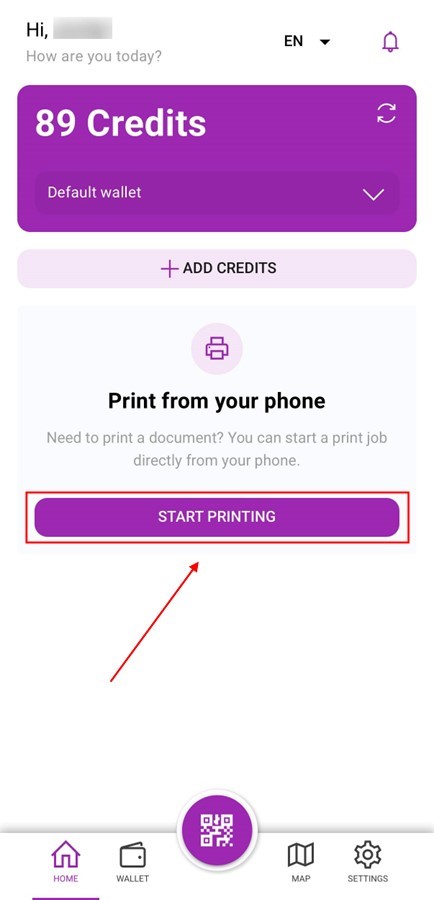
Open the PrintPayGo app on your phone.
Click Start printing.
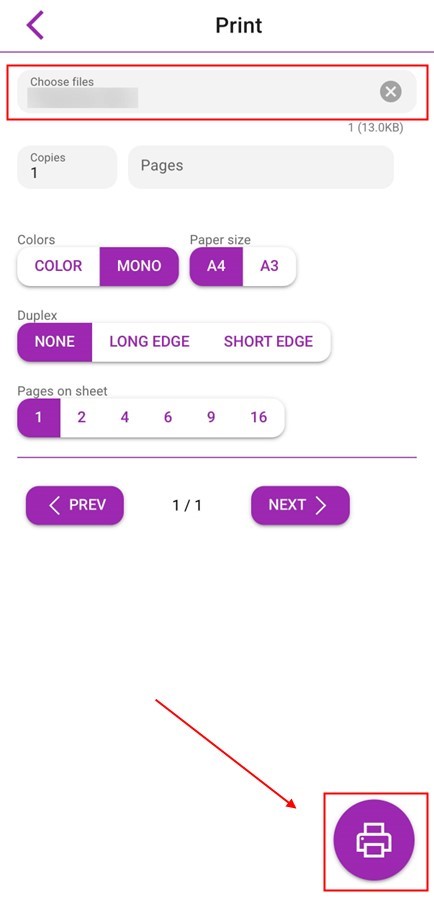
Select the document you want to print.
Set the print settings: number of copies, specify pages if necessary, etc.
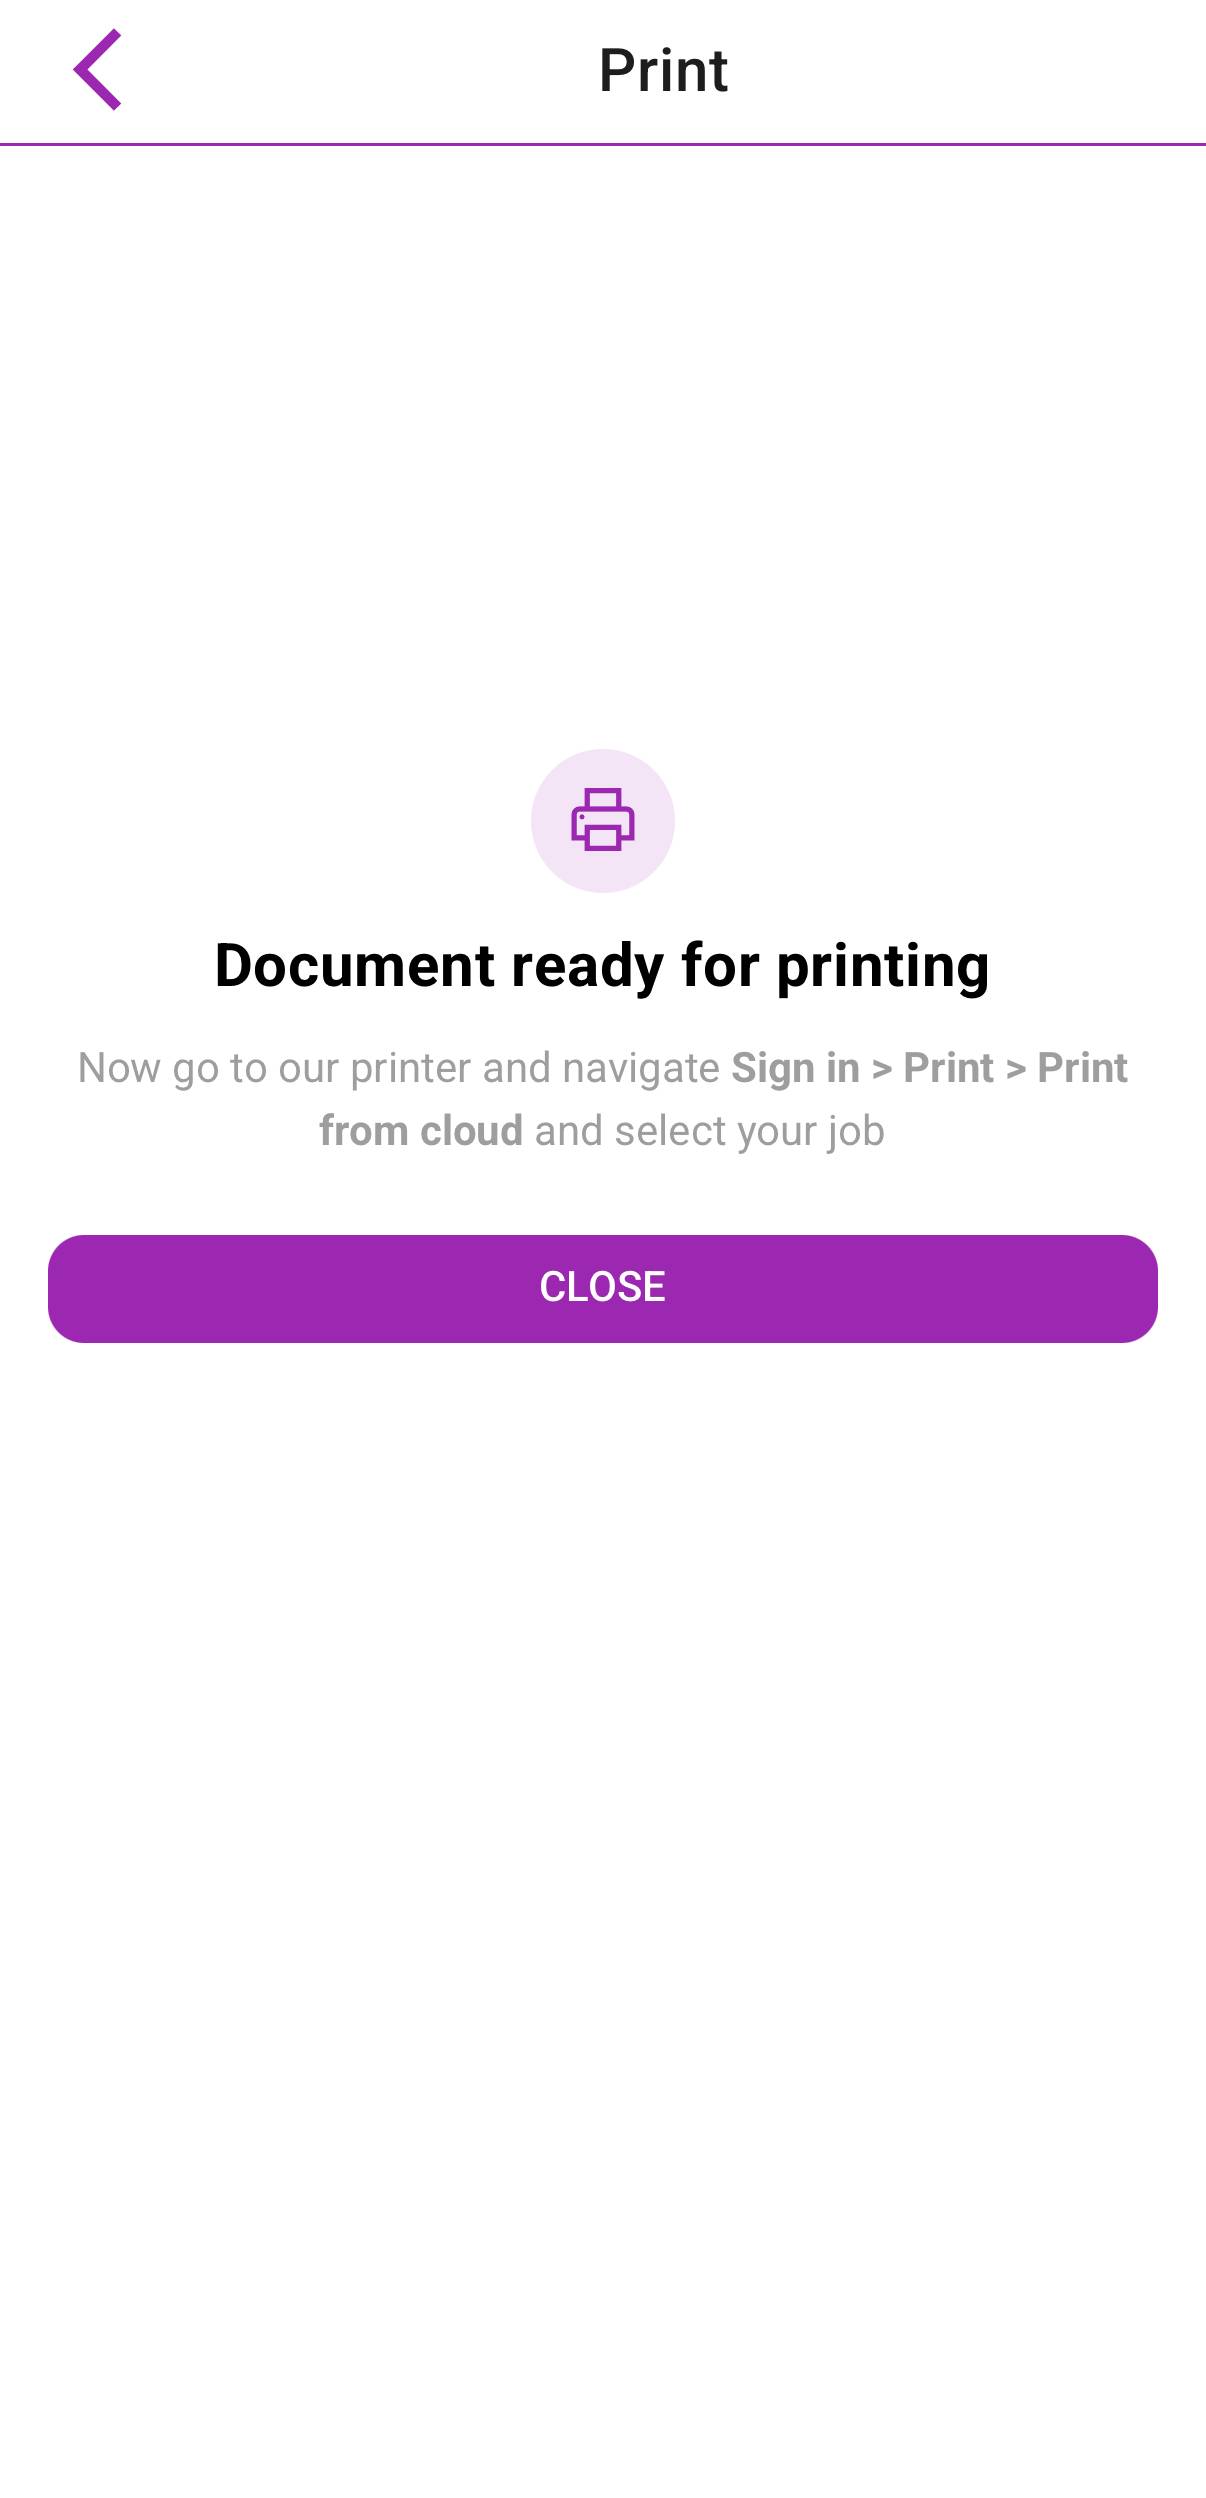
Click the printer icon. The document has been uploaded to the cloud and is ready to print.
Now you can go to the printer, log in to your account (using your email and password or by scanning the QR code with the app).
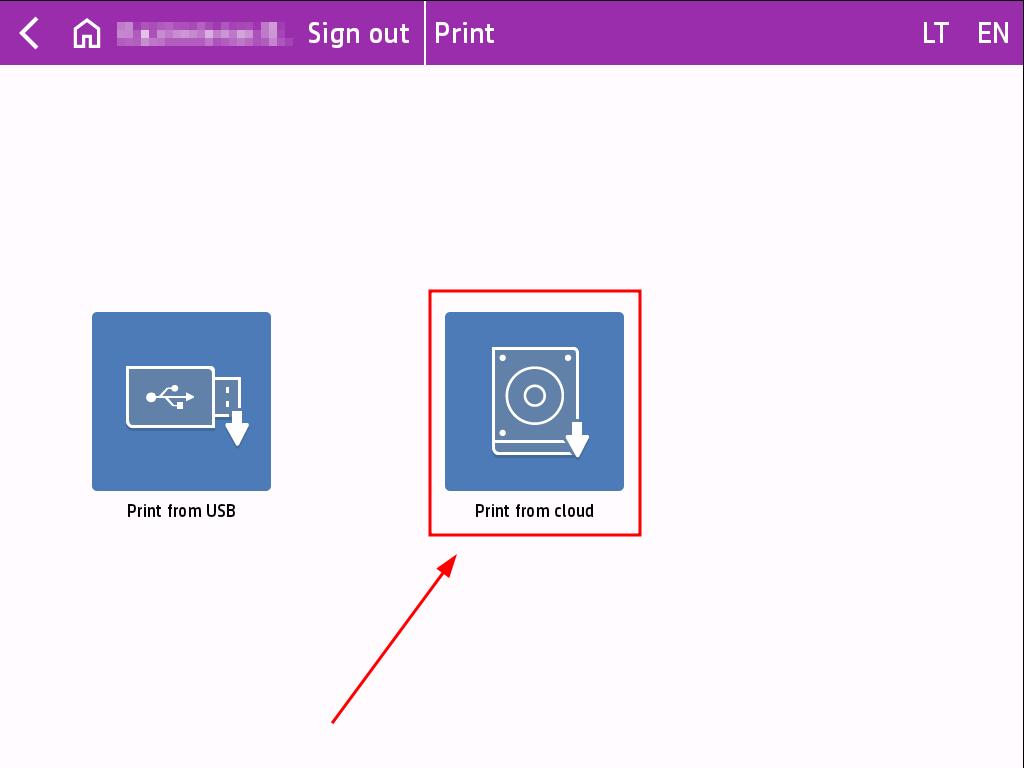
Select Print, then Print from the Cloud and choose the document you want to print.
Click Print.
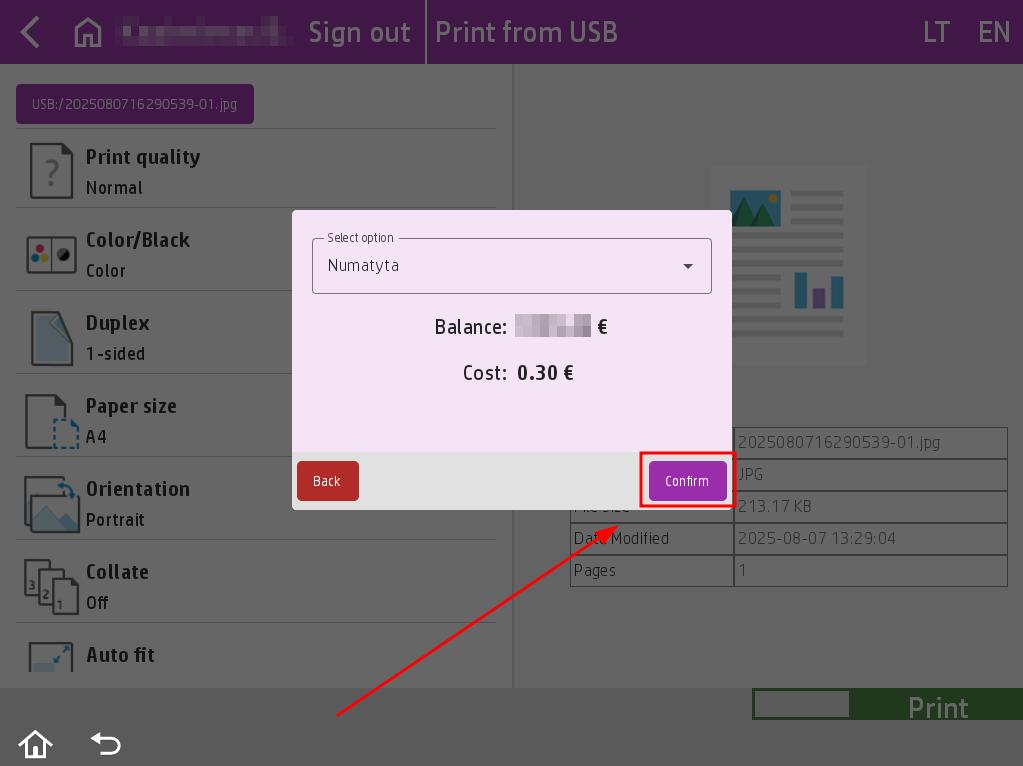
Before printing, a pop-up window will appear showing the cost of the job. Select the wallet you want to use to pay for the print job. Click the Confirm button.
Once the work is approved, it will be sent to print.
Log in to the printer with your PrintPayGo account, select Print, then select Print from USB.
Insert the USB flash drive into the right side of the printer and wait until the printer beeps to indicate that it has recognized the USB device. The USB flash drive must be formatted in FAT32 format.
You can configure the print job in the list of options on the left side.
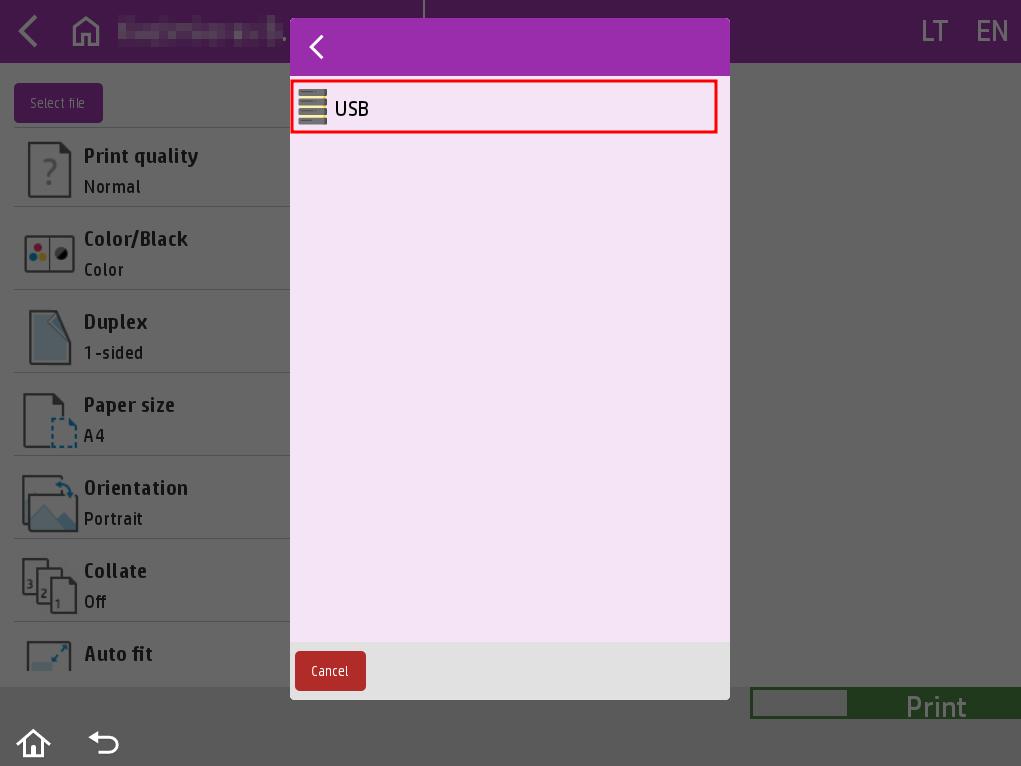
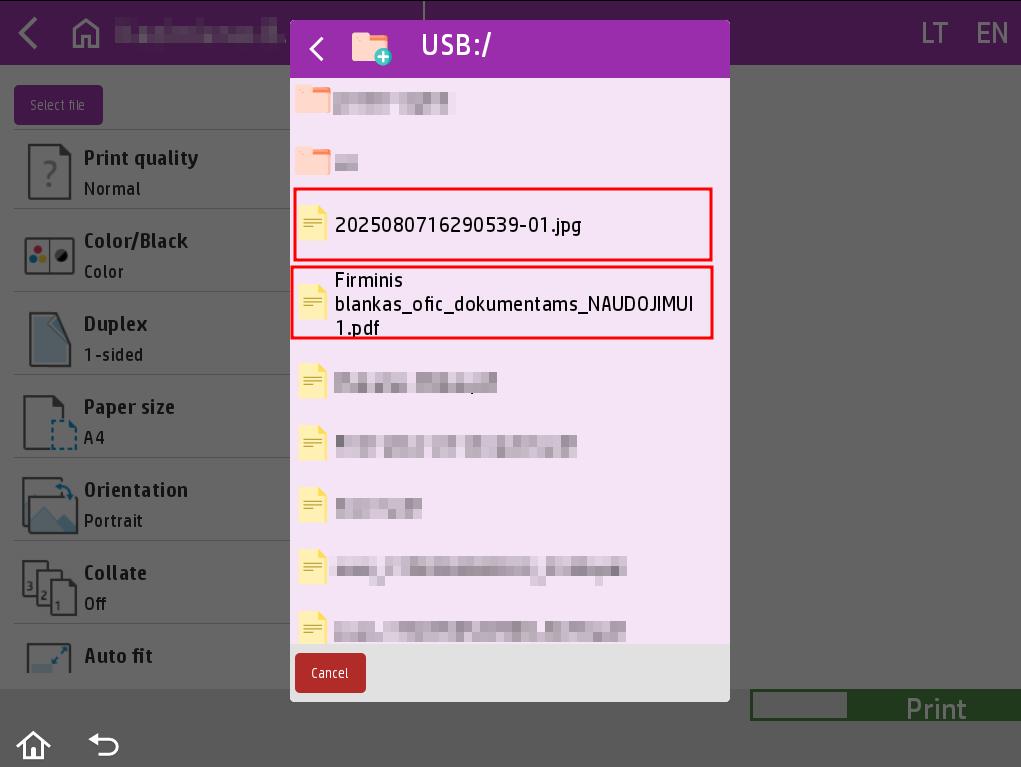
Before printing, press the Select file button on the left side and select the job you want to print. When the window appears, press USB and select the file by clicking on the desired file.
When you are ready to print, select the number of copies and click the Print button.
Before printing, an additional window will appear with the cost of the job. Select the wallet you want to use to pay for printing and click the Confirm button.
Once you confirm, your job will start printing.
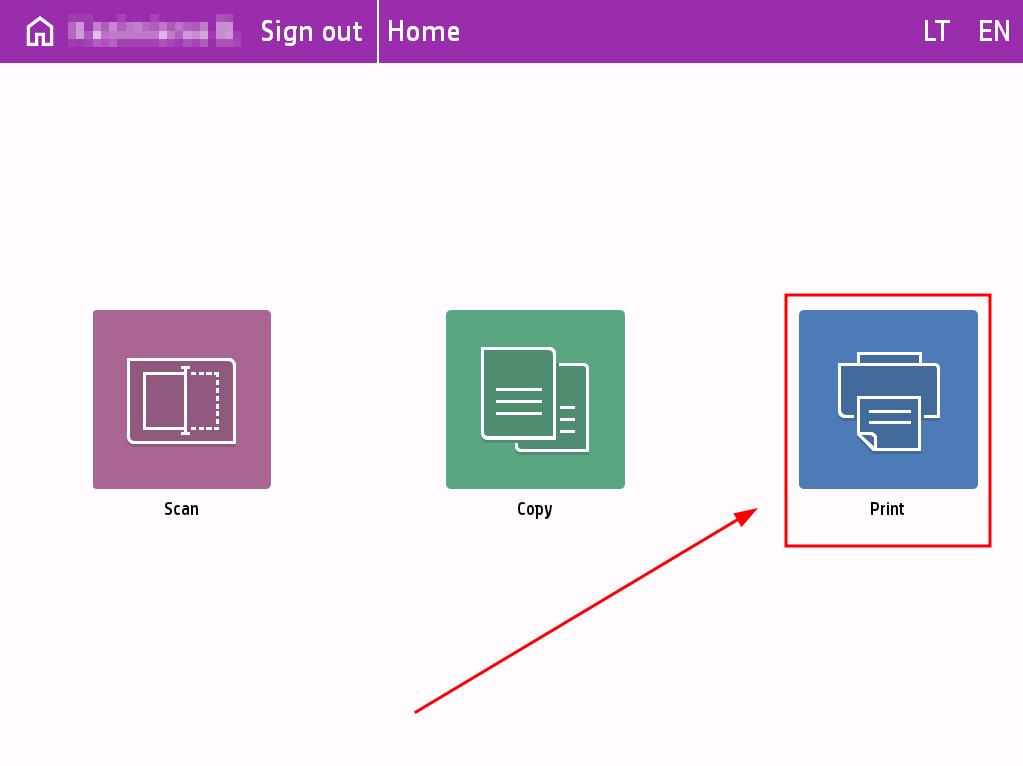
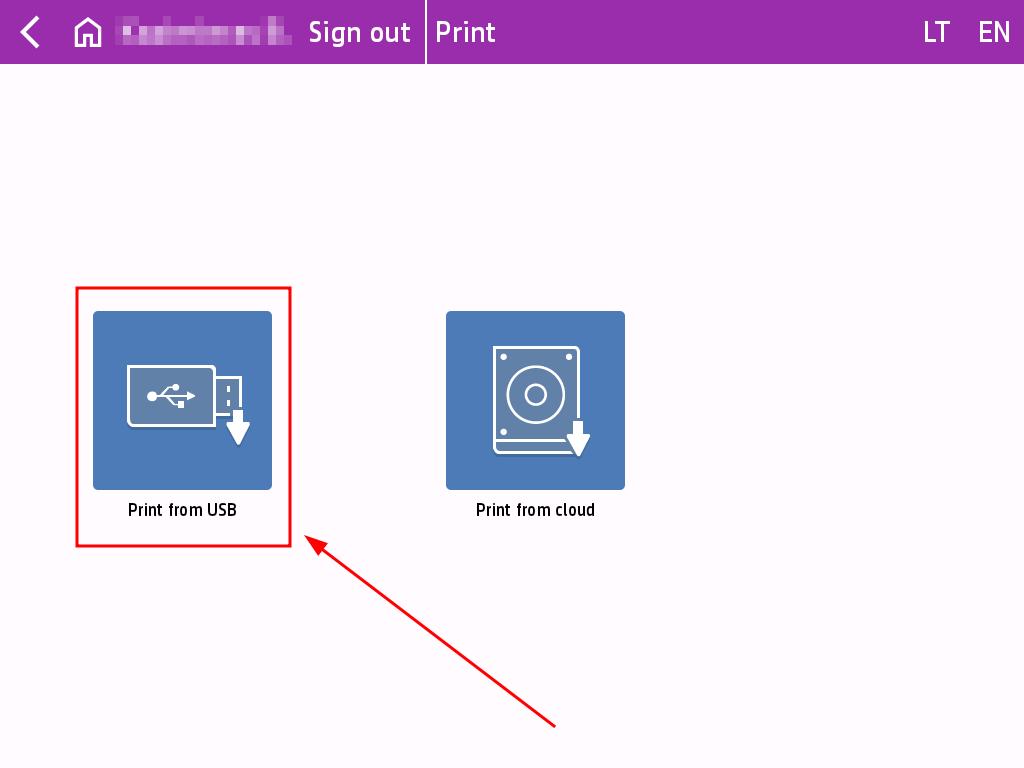
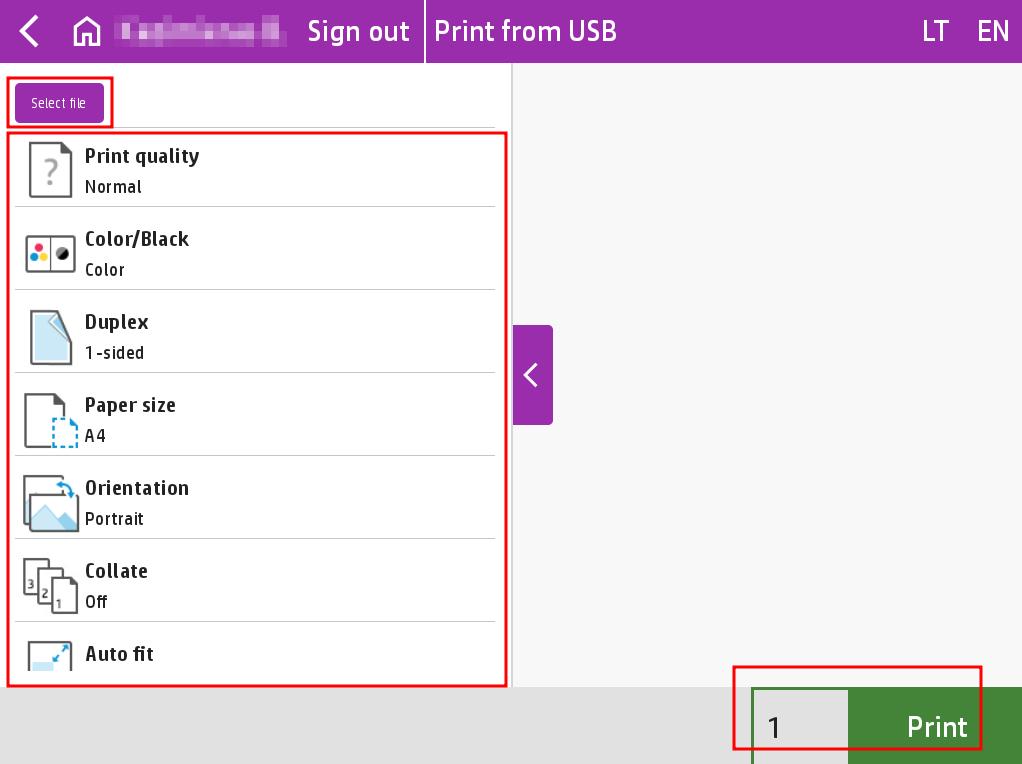
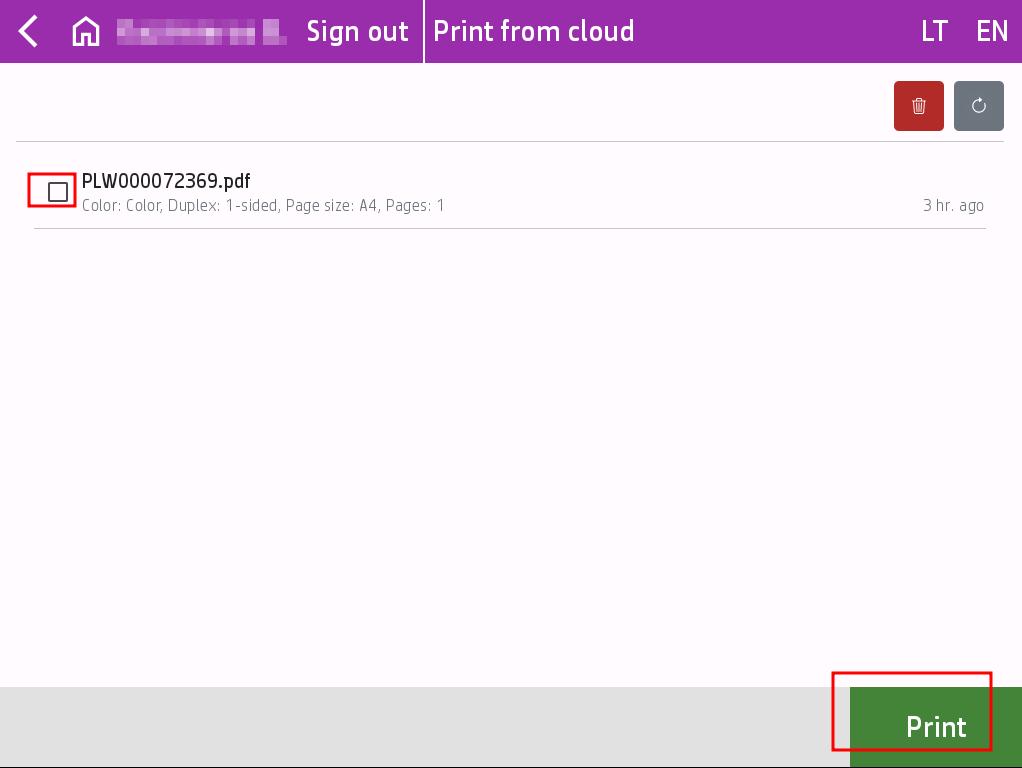
Log in to the printer with your PrintPayGo account, select Print, then select Print from cloud.
Select the jobs you want to print and press the Print button.
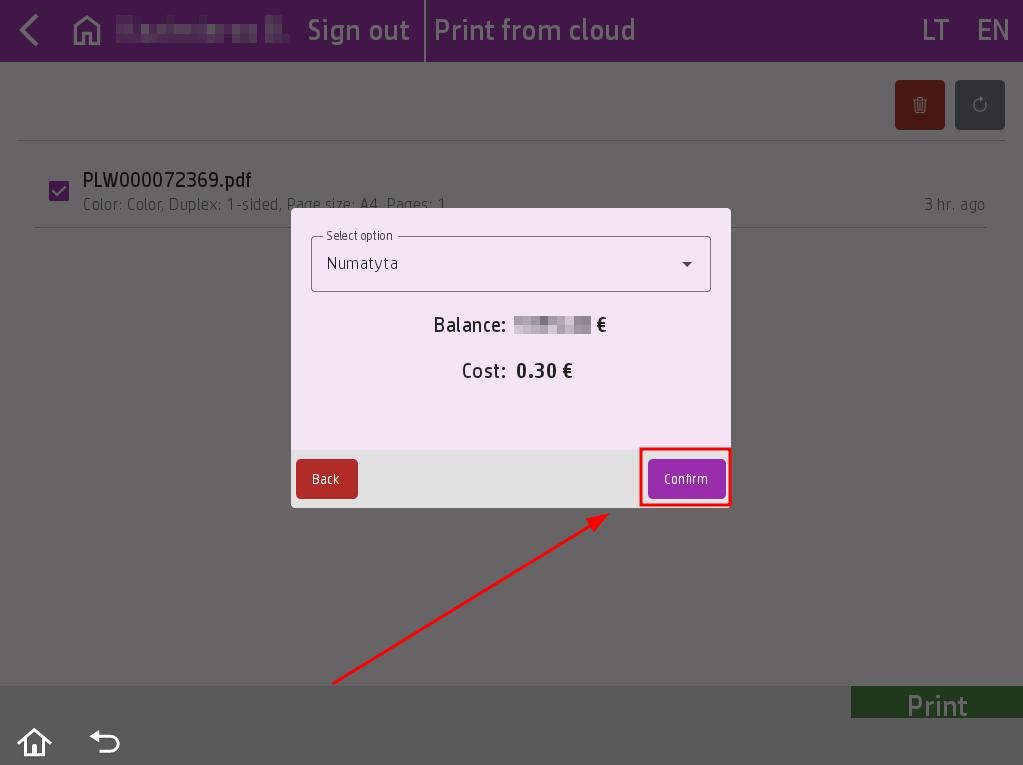
Before printing, an additional window will appear showing the cost of the job. Select the wallet you want to use to pay for printing and press the Confirm button.
Once you confirm the job, your job will start printing.
Install our printer driver, which you can find here.
Open the document you want to print and click Print.
Select the “PrintPayGo Printer” and click Print.
After a short moment, a login window should appear.
Log in using your email and password, or scan the QR code using our mobile application.
If the upload is successful, the window will close, and you will be able to use our printer and perform cloud printing.
By default, documents are saved in PDF format.
You can save the scanned document to a USB drive, via email, or in other locations offered by the system.
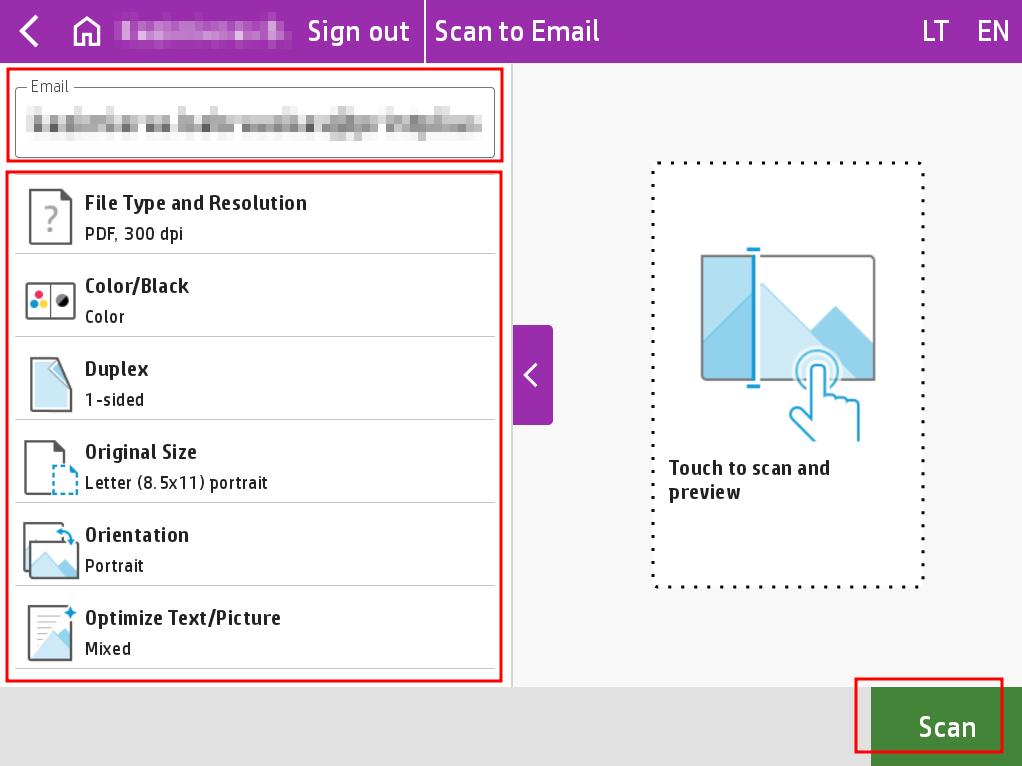
Log in to the printer with your PrintPayGo account, select Scan, then select Scan to Email.
You can configure the scan job in the list of options on the left side.
If you want to scan to an email address other than the one registered in your account, enter the desired email address.
When you are ready to scan, press the Scan button.
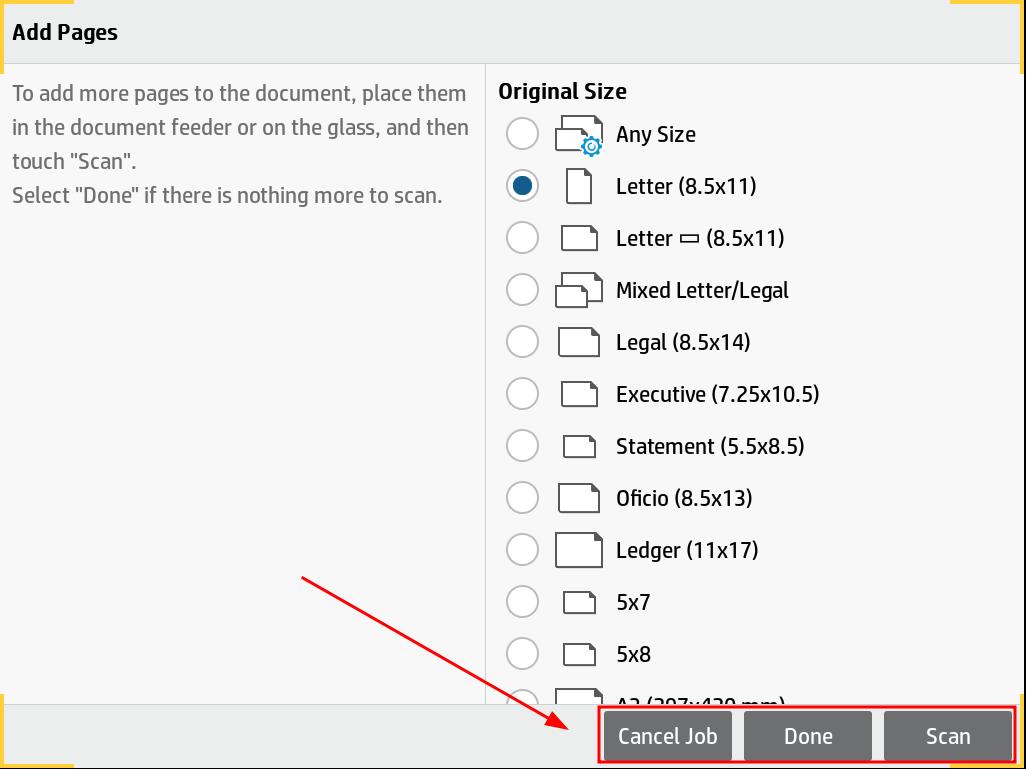
After scanning the job, you will be asked if you want to scan an additional job in the same scanning session. If you need to scan an additional job, prepare the job for scanning and press the Scan button. If you do not need to scan any additional jobs, press the Done button. If you want to cancel the scan, press the Cancel Job button.
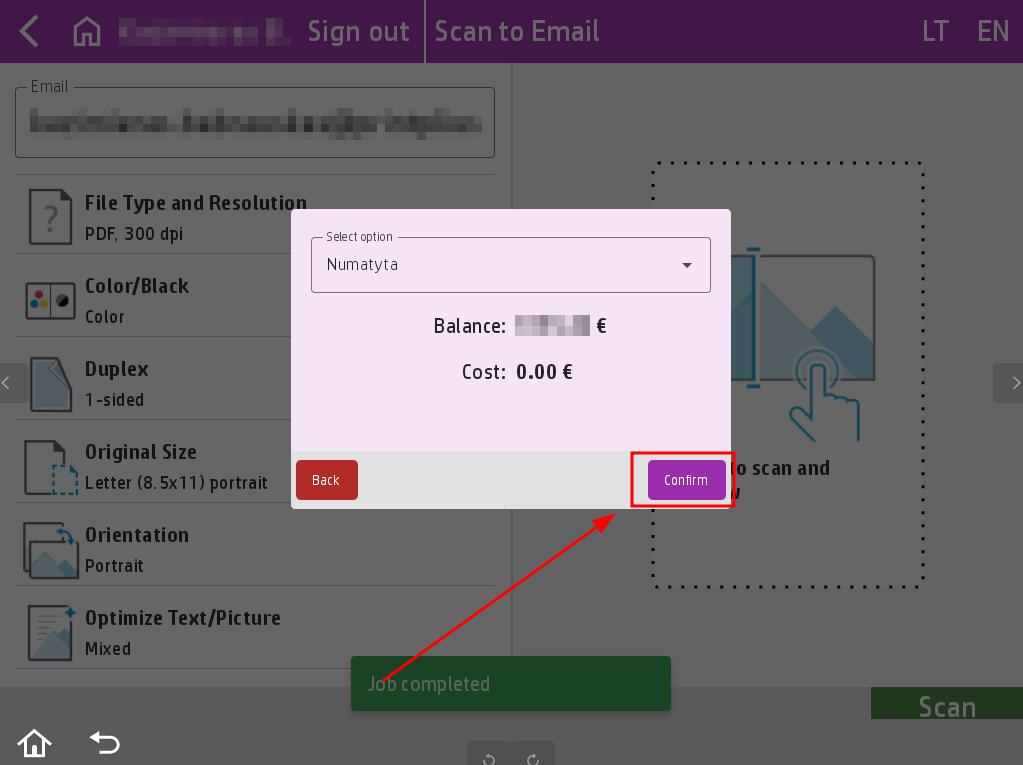
After scanning, an additional window will appear with the cost of the service. Select the wallet you want to use to pay for the scan and click the Confirm button.
Once the work has been approved, the scanned work will be sent to your chosen email address.
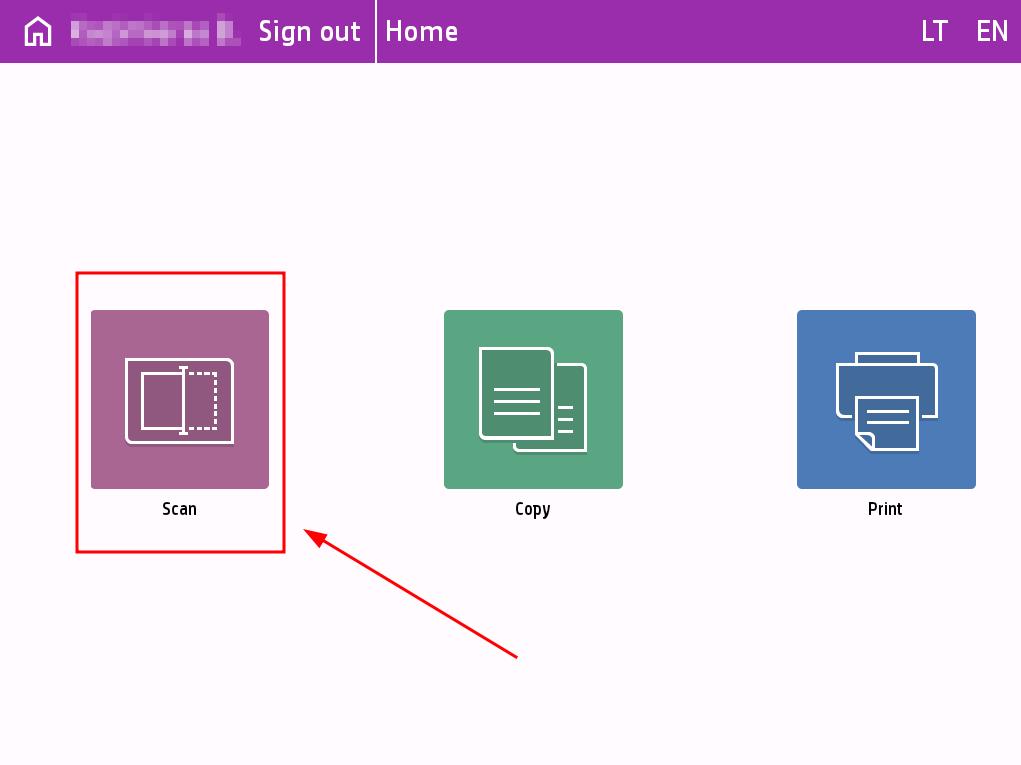
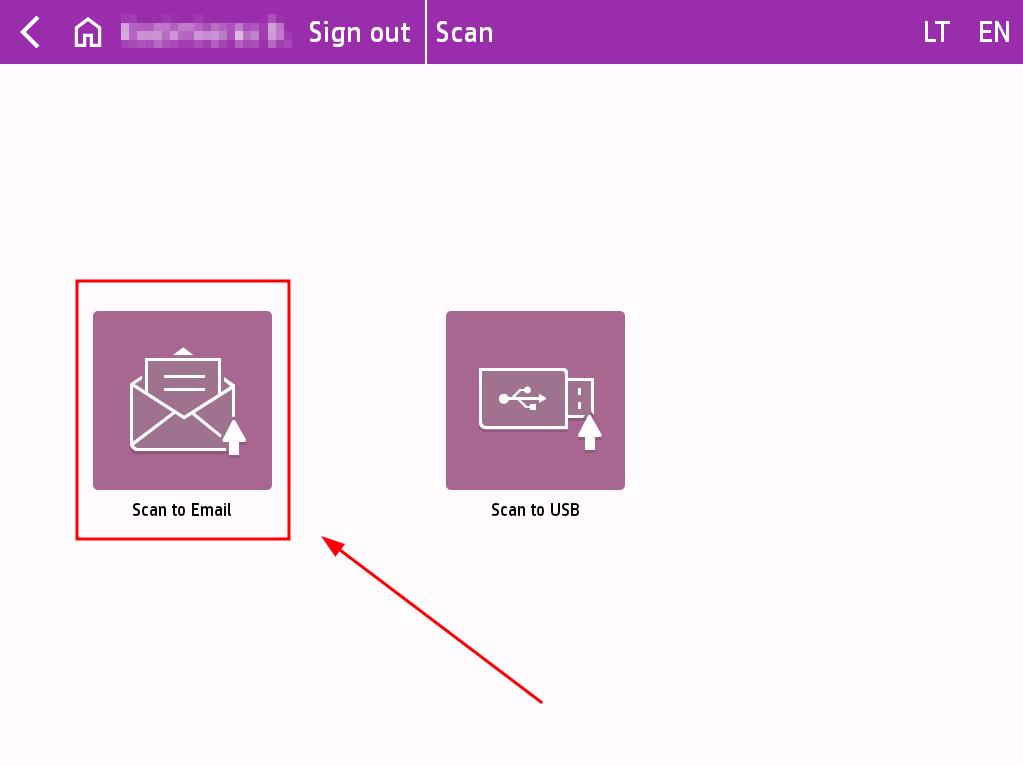
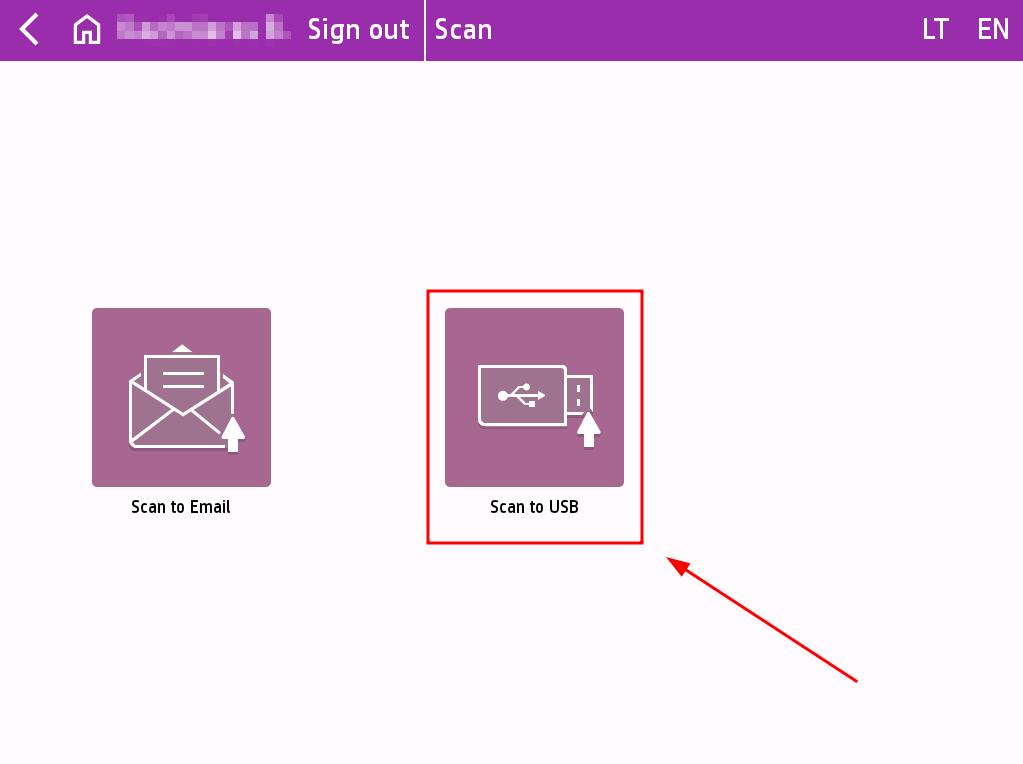
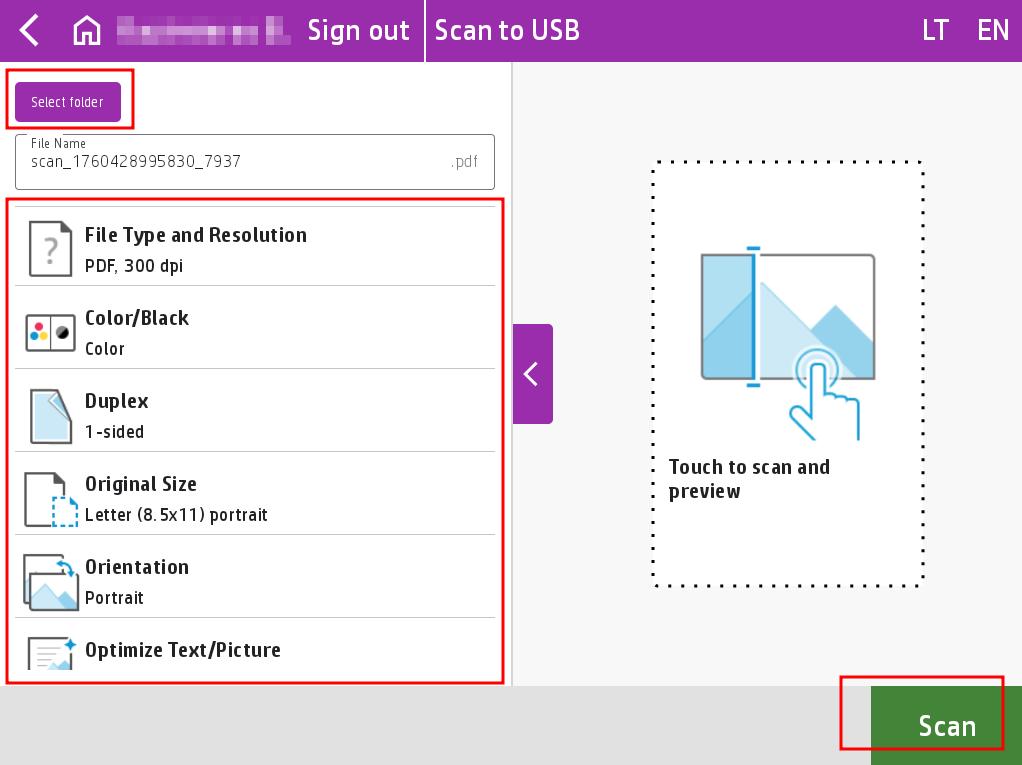
Log in to the printer with your PrintPayGo account, select Scan, then select Scan to USB.
Insert the USB flash drive into the right side of the printer and wait until the printer beeps to indicate that it has recognized the USB device. The USB flash drive must be formatted in FAT32 format.
You can configure the scan job in the list of options on the left side.
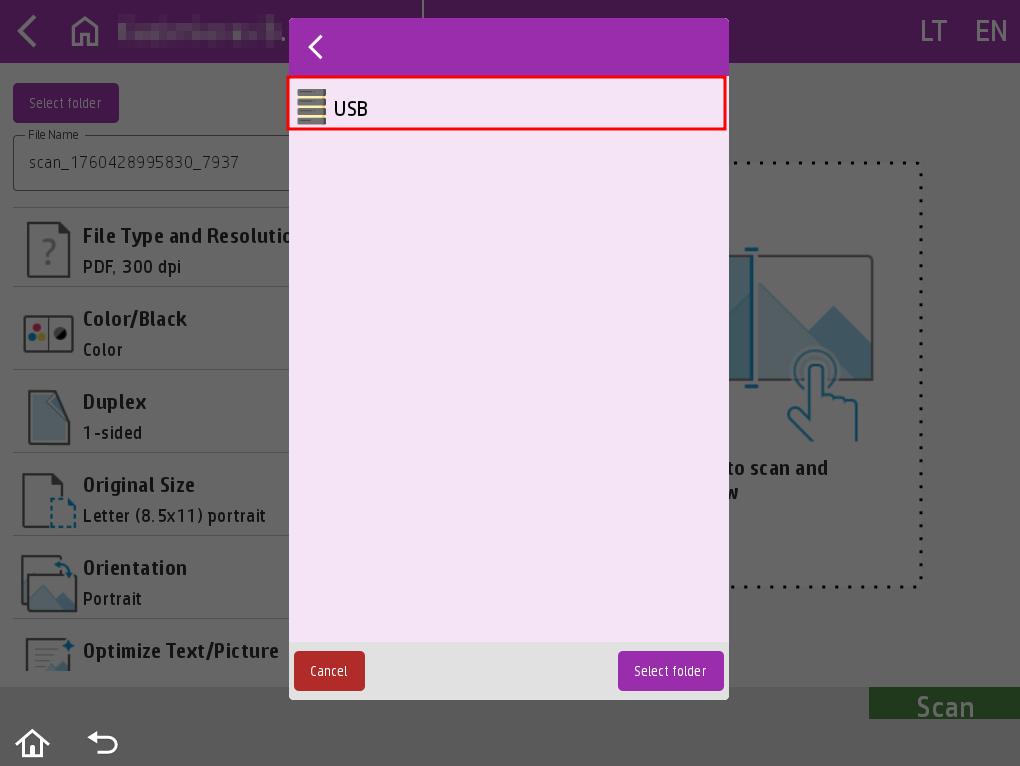
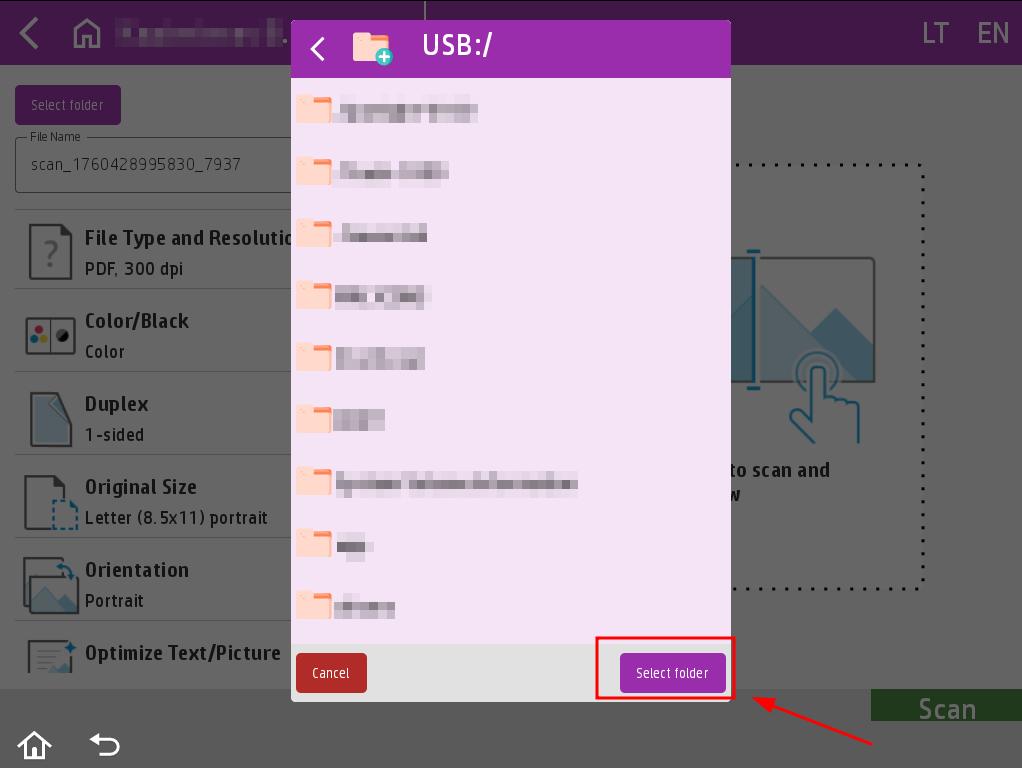
Before scanning, click the Select Folder button on the left side and choose where you want to save the scanned job. When the window appears, click USB and select the location where you want to save the scanned job by clicking the Select Folder button..
When you are ready to scan, click the Scan button.
After scanning the job, you will be asked if you want to scan an additional job in the same scanning session. If you need to scan an additional job, prepare the job for scanning and press the Scan button. If you do not need to scan any additional jobs, press the Done button. If you want to cancel the scan, press the Cancel Job button.
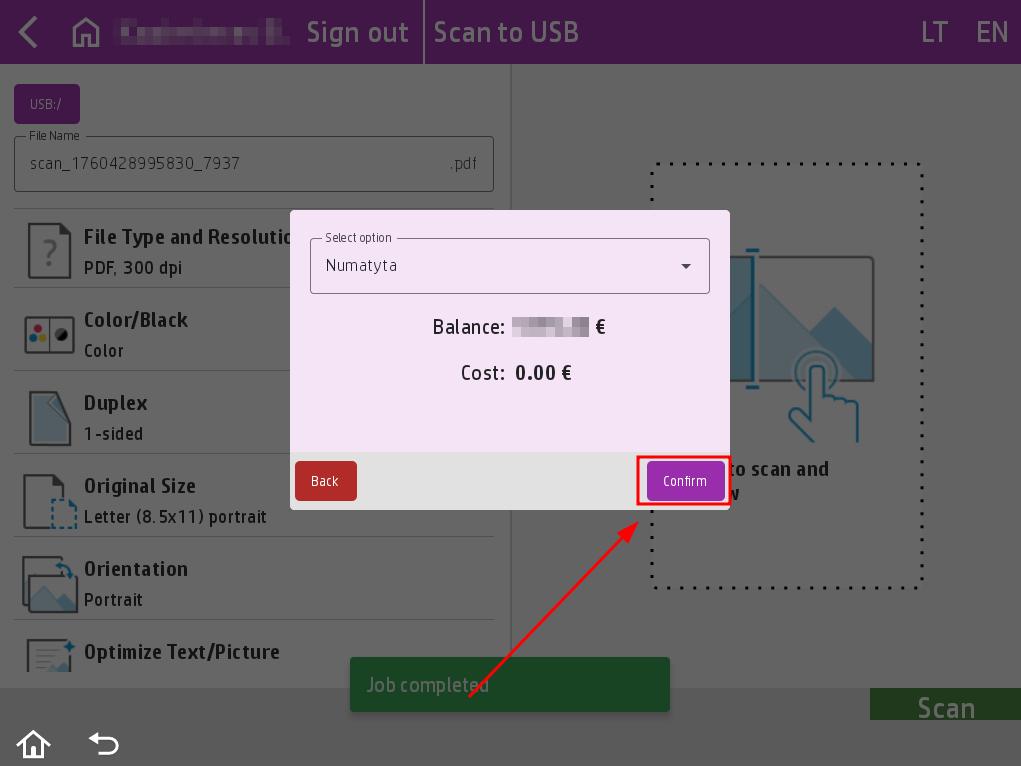
After scanning, an additional window will appear with the cost of the job. Select the wallet you want to use to pay for the scan and press the Confirm button.
After confirming the job, the scanned job will be uploaded to your USB flash drive in a few seconds.
Yes. If you need to combine several pages, you can merge them into a single PDF file.
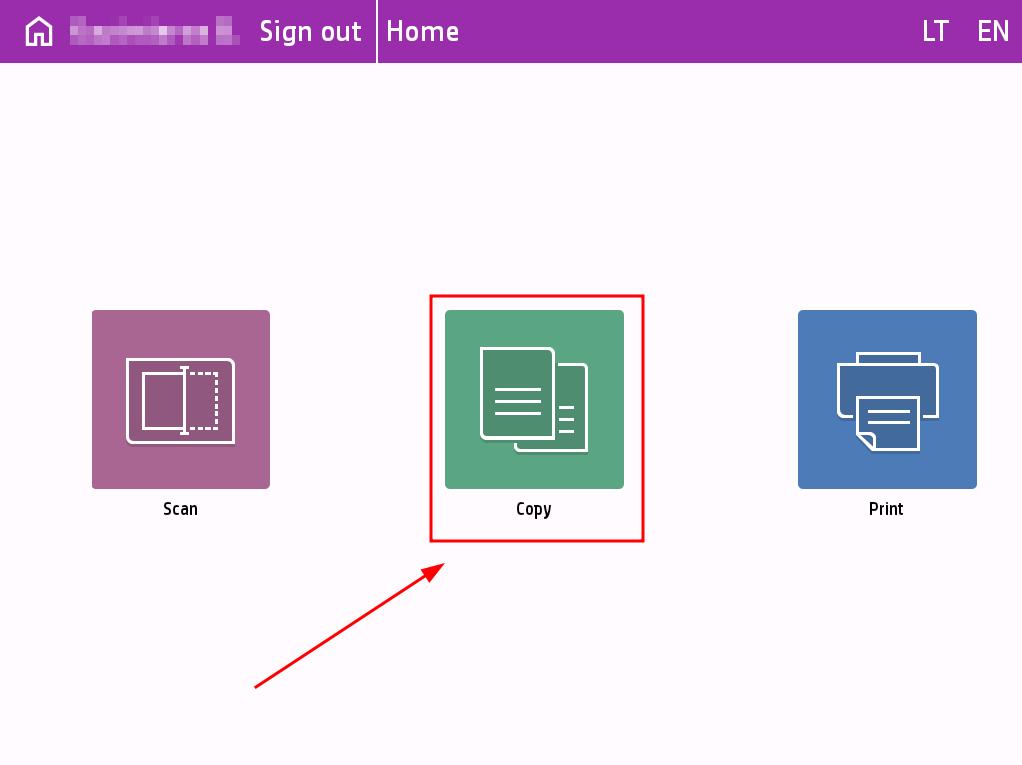
Log in to the printer with your PrintPayGo account and select Copy.
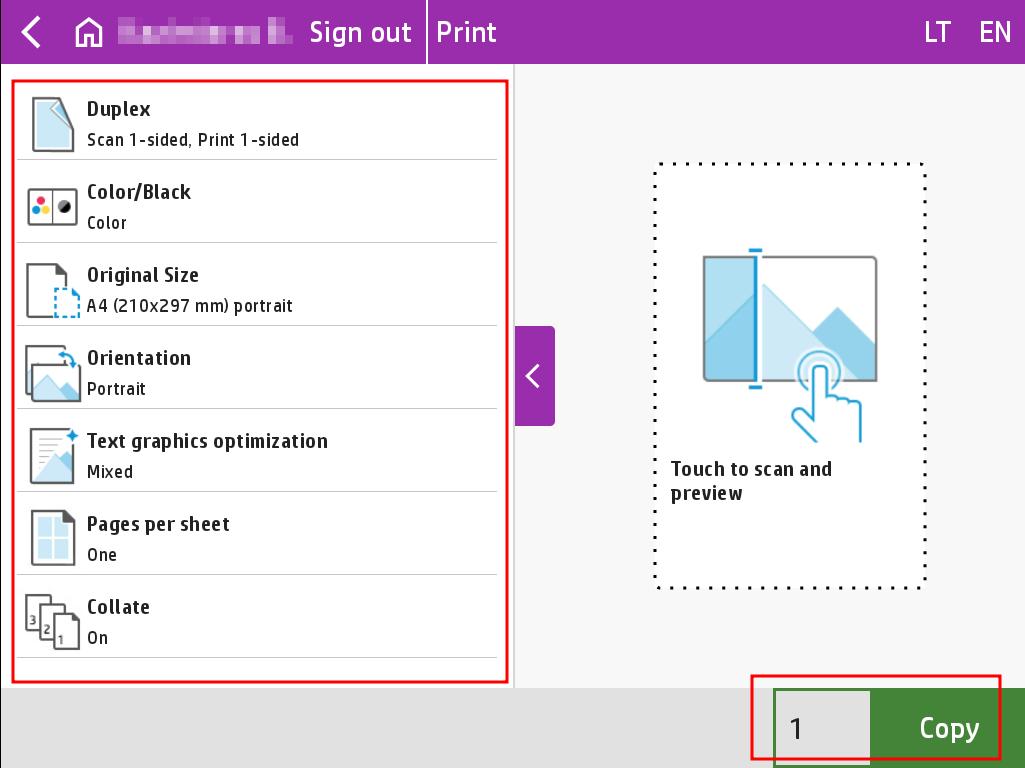
You can configure the copy job in the list of options on the left.
When you are ready to copy, select the number of copies and press the Copy button.
After scanning the job, you will be asked if you want to scan an additional job in the same scanning session. If you need to scan an additional job, prepare the job for scanning and press the Scan button. If you do not need to scan an additional job, press the Done button. If you want to cancel the copy job, press the Cancel Job button.
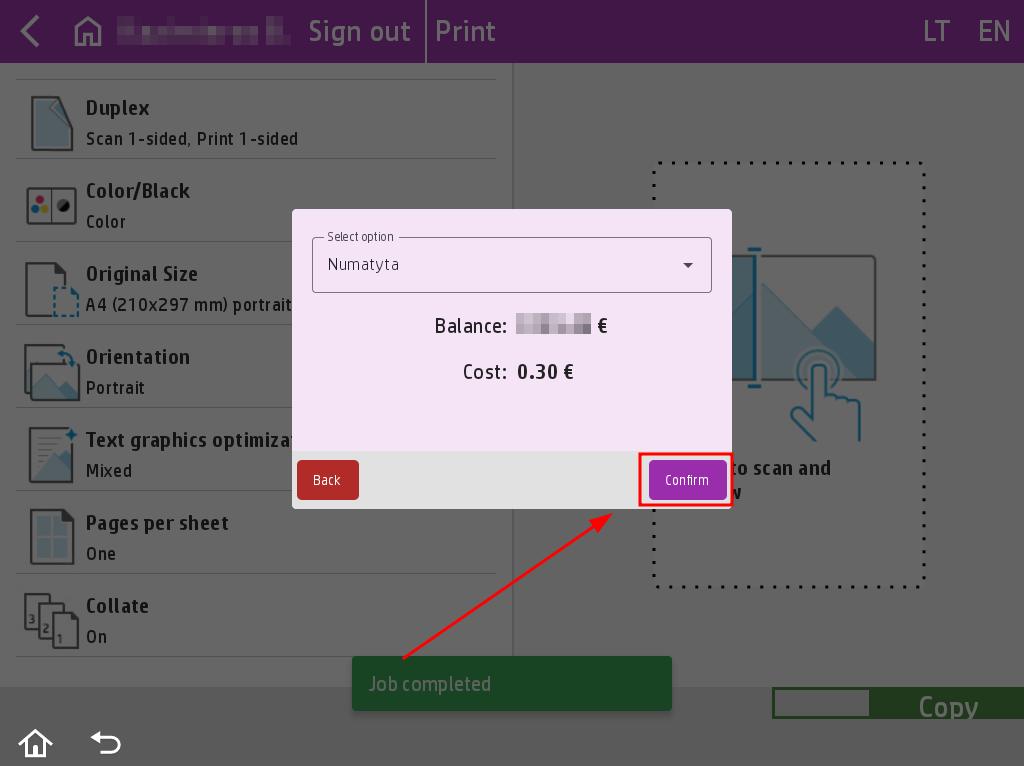
After scanning, an additional window will appear with the cost of the job. Select the wallet you want to use to pay for the copy and press the Confirm button.
Once the job is confirmed, the scanned job will be printed.